Guide contents and quick links
- Example
🔍 How to find User Management Tool in the Eduhouse Service?
-
Log in to the Eduhouse Service.
-
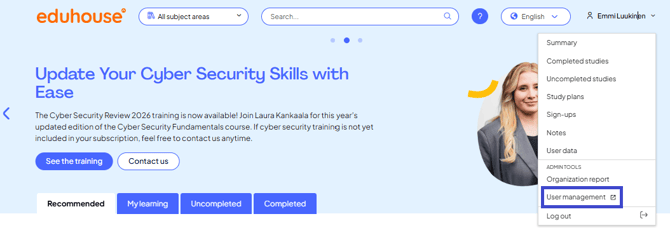
Open User profile by clicking your name on the top bar.
-
Click the 'User Management' link under the Admin Tools section. This will open the User Management tool's homepage.
📋 Features in the tool
User Management tool provides tools for admin users to:
-
Add/invite new users to Eduhouse Service
-
Edit user information (update name, department and team information)
-
Manage (add, remove) users from user groups
Email addresses cannot be changed in the User Management tool due to technical reasons. If you need to update an email address, please contact Eduhouse Support.
👤➕ Invite new users to Eduhouse service
Inviting new or existing users can be done via the Users or User groups views.
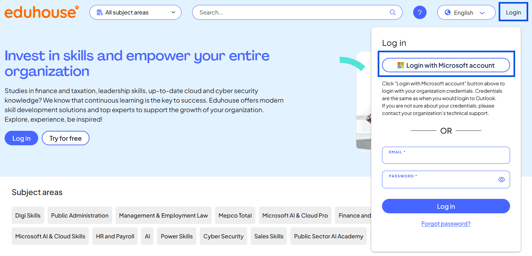
If your organisation uses Microsoft Single Sign-On (SSO), new users can register easily by going to the Eduhouse app, clicking “Log in”, then selecting “Login with Microsoft”, and completing the registration with their Microsoft account.
Steps to invite new or existing users:
1. Log in to Eduhouse and open "User Management" from your user profile menu.
2. On the Overview page:
-
Go to Users in the left-hand menu OR
-
-
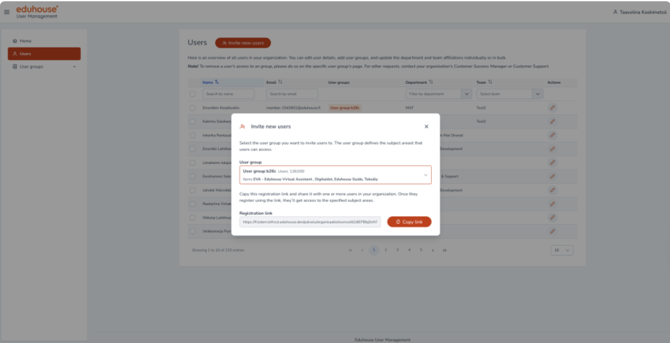
Click on Invite new users
-
Select a user group
-
A registration link will be generated
-
-
Go to User groups
-
-
Go to a User group
-
Click on Invite new users
-
A registration link is ready
-
💡Tip: If your organisation has multiple user groups, check which subject areas are included in each group and select the appropriate user group from the list.
3. The link is user group-specific and registering through it will grant access to the subject areas included in that user group.
4. Click “Copy link” and share it via email or other preferred channels with the person(s) you want to invite to the user group.
5. The recipient of the invitation is directed to the service’s registration page via the link, where they fill in the registration form.
6. After registering, the user will gain access to the service. The user(s) will appear in the User Management tool listing under the selected user group and in the list of users once the registration is complete.
💡Tip: As the user is visible in the User Management tool after the registration, we recommend monitoring the registration status of the people you’ve invited and sending them a reminder if needed.
In some cases, it may not be possible to add new users to an agreement. This can happen if the agreement has reached its user limit or cannot be modified via the User Management tool due to contractual reasons. Please contact Eduhouse Customer Support for any necessary changes.
👥➕ Add existing user in User groups view
Some users may already have an existing account in the Eduhouse Service. These users do not need to register again. They can be added directly to the User group without sending them a registration link.
Add existing user in User group view
-
Log in to Eduhouse and open User management below user profile.
-
From the Overview page, open User groups in the left-hand side navigation bar.
-
Select a user group from navigation bar.
-
Click on Invite existing users.
-
Search or select user from the list.
-
Click on Add.
-
Changes are saved.
-
User(s) have been added to the selected agreement.

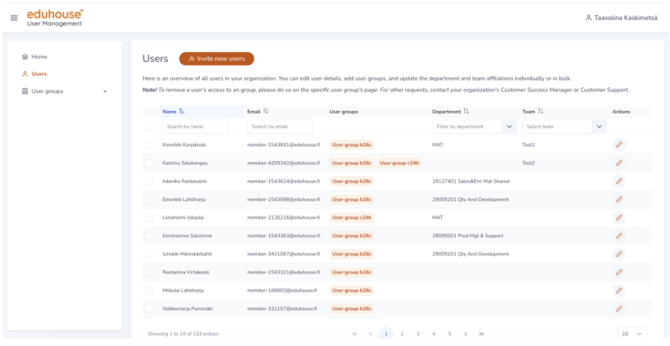
✏️ Edit user information in Users view
User information can be modified in Users view. In this page, you can see all the Users that belong into your organization – not only the ones that have active accesses.
Edit user information in Users view (individual change)
- Log in to Eduhouse and open User management below user profile.
- From the Overview page, open Users in the left-hand side navigation bar.
- Select a user from the user list.
- Click on Actions (pen icon)
- You can edit following information:
- First name
- Last name
- Department (create new or modify existing)
- Team (create new or modify existing)
5. Click on Save.
6. Changes are saved.
7. User's information has been updated.
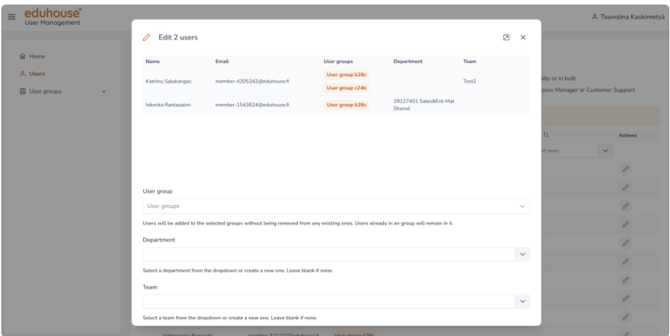
Edit user information in Users view (bulk changes)
- Log in to Eduhouse and open User management below user profile.
- From the Overview page, open Users in the left-hand side navigation bar.
- Select multiple users from the user list (selection box).
- Click on Edit users.
- You can edit following information:
- Department
- Team
5. Click on Save.
6. Changes are saved.
7. Users information has been updated.
Email addresses cannot be changed via the User management tool due to technical reasons. If email address must be changed, please contact Eduhouse Support.
Teams and departments are optional. This information is used in Organization reporting. If you wish to set up team and department structure, the structure can be done and managed in Users view by setting a member to a team and/or department.
Please note that one user can belong only to one team and/or one department at the same time.
🔁 Manage users from user groups (Users view)
User association with a user group can be modified in Users view. In this page, you can see all users that belong to your organization – not only the ones that have active accesses.
Edit user's user groups in Users view (individual change)
-
Log in to Eduhouse and open User management below user profile.
-
From the Overview page, open Users in the left-hand side navigation bar.
- Select a user from the user list.
- Click on Actions (pen icon)
- You can edit following information:
-
User group
-
5. Click on Save.
6. Changes are saved.
7. User's user groups have been updated.
Edit user information in Users view (bulk changes)
- Log in to Eduhouse and open User management below user profile. From the Overview page, open Users in the left-hand side navigation bar.
- Select multiple users from the user list (selection box).
- Click on Edit users.
- You can edit following information:
-
User group
-
4.Click on Save.
5.Changes are saved.
6.Users' user groups have been updated.
👤➖ Remove users from user groups (User groups view)
User association with a user group can be removed in User groups view. In this page, you can see all user groups with active items that belong to your organization – user groups with expired items and no items are not visible.
Edit user's user groups in User groups view (individual change)
- Log in to Eduhouse and open User management below user profile.
- From the Overview page, open User groups in the left-hand side navigation bar.
- Select a user from the user list.
- Click on Actions (user icon)
- User removal modal is displayed.
-
Click on Remove from user group.
-
Changes are saved.
- User is removed from user group(s).
Edit user's user groups in User groups view (bulk changes)
- Log in to Eduhouse and open User management below user profile.
- From the Overview page, open User groups in the left-hand side navigation bar.
- Select users from the user list.
- Click on Remove users from the user group.
- User removal modal is displayed.
- Click on Remove from user group.
- Changes are saved.
- Users are removed from user group(s).
